Azure Lighthouse is a name I heard a while back, and while the concept was easy to grasp and even using it once set up wasn’t too complicated, I’ve never actually set one up myself. I recently got a Microsoft 365 tenant for my own business needs, and along with that side of operations management, it also opened up the possibility of setting up another Azure tenant and seeing how a more or less MSP-like operation could and would be run. So let’s go on a little adventure and set up Azure Lighthouse with a subscription or two from another Azure tenant.
Gathering the necessary information
In a nutshell, onboarding is done by sending the customer an ARM template that they import into their tenant, and the portal makes this a very simple task. To manually create a template, you will need the following information:
- the tenant ID of you own tenant, essentially considered as the service provider in this case
- the tenant ID of the customer’s tenant
- all subscription IDs of the subscriptions to be managed
The tenant IDs can be obtained using Azure Portal, PowerShell or Azure CLI: https://learn.microsoft.com/en-us/azure/active-directory/fundamentals/how-to-find-tenant
This is also the point where you should take some time to consider the necessary roles and permissions you’ll need to manage the customer’s tenant. While I don’t have any practical experience here, I’d be willing to guess that creating relevant user groups in Microsoft Entra would be the way to go, as is typical. Think different tier techs and all that, but since this is my own little project, I’ll just add myself.
Creating the ARM template
Portal is usually the easiest option for a first run, so let’s start there.
First we’re asked for a Name and an optional Description, straightforward enough. We also need to choose whether this template, or offer as they’re called, will be scoped to an entire subscription or just a specific resource group. We’ll go with the former.
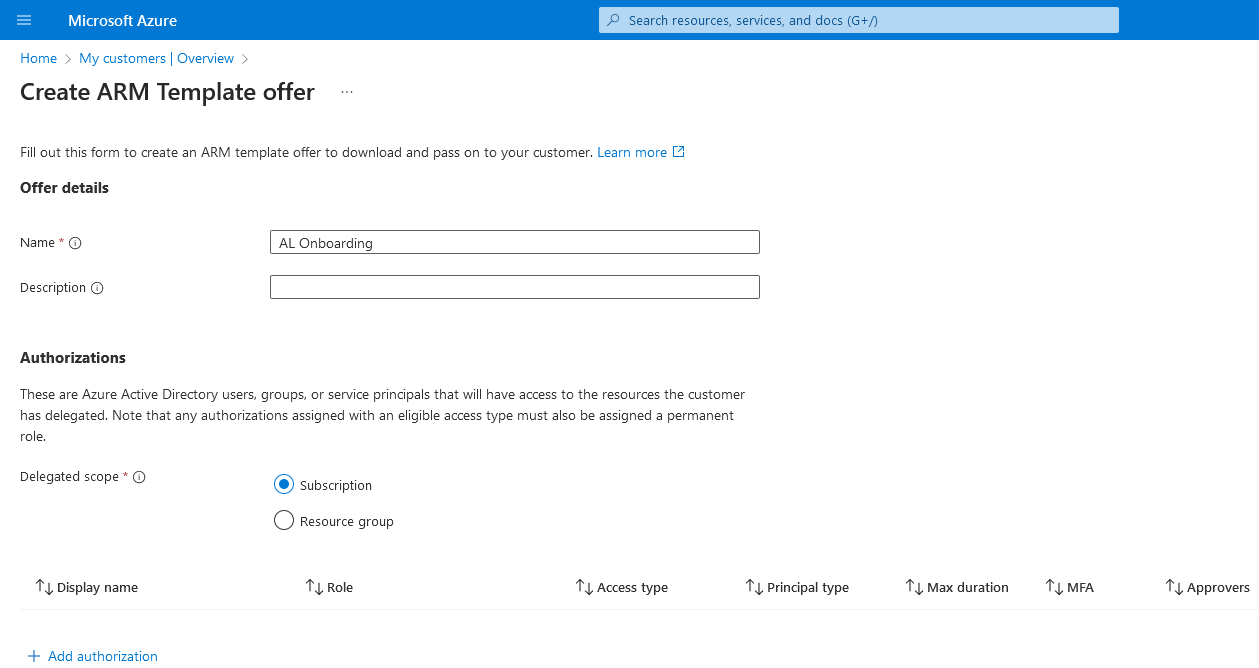
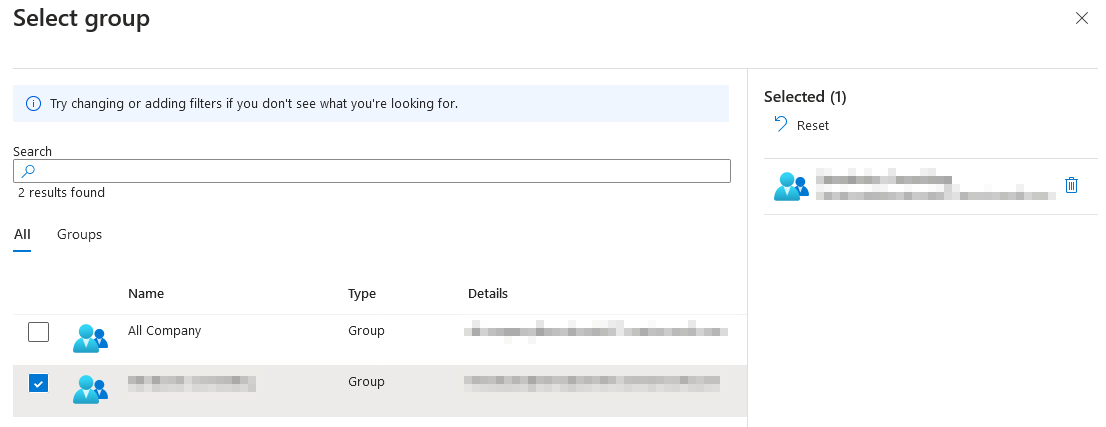
Next we need to add the authorization. This is essentially the roles and permissions I mentioned earlier, and you’ll probably want to go with a group assignment with a group that’s supposed to manage that part of the offer. I’ll just add a user as Reader with Permanent access type, meaning that the access doesn’t need to be specifically activated when needed, but obviously for increased security the access should be limited to just-in-time. Pros and cons to both approaches as usual.
Finally we can click View template to get the following JSON code (with private information redacted, of course):
1
2
3
4
5
6
7
8
9
10
11
12
13
14
15
16
17
18
19
20
21
22
23
24
25
26
27
28
29
30
31
32
33
34
35
36
37
38
39
40
41
42
43
44
45
46
47
48
49
50
51
52
53
54
55
56
57
58
59
60
61
62
63
64
65
66
{
 "$schema": "https://schema.management.azure.com/schemas/2019-08-01/subscriptionDeploymentTemplate.json#",
 "contentVersion": "1.0.0.0",
 "parameters": {
  "mspOfferName": {
   "type": "string",
   "metadata": {
    "description": "Specify a unique name for your offer"
   },
   "defaultValue": "AL Onboarding"
  },
  "mspOfferDescription": {
   "type": "string",
   "metadata": {
    "description": "Name of the Managed Service Provider offering"
   },
   "defaultValue": ""
  }
 },
 "variables": {
  "mspRegistrationName": "[guid(parameters('mspOfferName'))]",
  "mspAssignmentName": "[guid(parameters('mspOfferName'))]",
  "managedByTenantId": "$TENANTID",
  "authorizations": [
   {
    "principalId": "$PRINCIPALID",
    "roleDefinitionId": "acdd72a7-3385-48ef-bd42-f606fba81ae7",
    "principalIdDisplayName": "$DISPLAYNAME"
   }
  ]
 },
 "resources": [
  {
   "type": "Microsoft.ManagedServices/registrationDefinitions",
   "apiVersion": "2020-02-01-preview",
   "name": "[variables('mspRegistrationName')]",
   "properties": {
    "registrationDefinitionName": "[parameters('mspOfferName')]",
    "description": "[parameters('mspOfferDescription')]",
    "managedByTenantId": "[variables('managedByTenantId')]",
    "authorizations": "[variables('authorizations')]"
   }
  },
  {
   "type": "Microsoft.ManagedServices/registrationAssignments",
   "apiVersion": "2020-02-01-preview",
   "name": "[variables('mspAssignmentName')]",
   "dependsOn": [
    "[resourceId('Microsoft.ManagedServices/registrationDefinitions/', variables('mspRegistrationName'))]"
   ],
   "properties": {
    "registrationDefinitionId": "[resourceId('Microsoft.ManagedServices/registrationDefinitions/', variables('mspRegistrationName'))]"
   }
  }
 ],
 "outputs": {
  "mspOfferName": {
   "type": "string",
   "value": "[concat('Managed by', ' ', parameters('mspOfferName'))]"
  },
  "authorizations": {
   "type": "array",
   "value": "[variables('authorizations')]"
  }
 }
}
This is the final template we’ll need to download and send to our customer for them to start the onboarding process, so let’s jump to my previous personal account to continue.
Deploying the ARM template in the customer’s tenant
As expected, deployment can be done using the Portal, PowerShell, or Azure CLI, and requires the Owner role. In the Portal we need to look up Service provider offers and navigate to Service provider offers to see the Add offer - Add via template dropdown.
Let’s start off with my development subscription called Nev-Dev, select that and click on Review + Create to run the final validation and creation. Once the deployment finishes we just need to wait a little while until our subscription shows up in the My customers section in the “service provider” account.
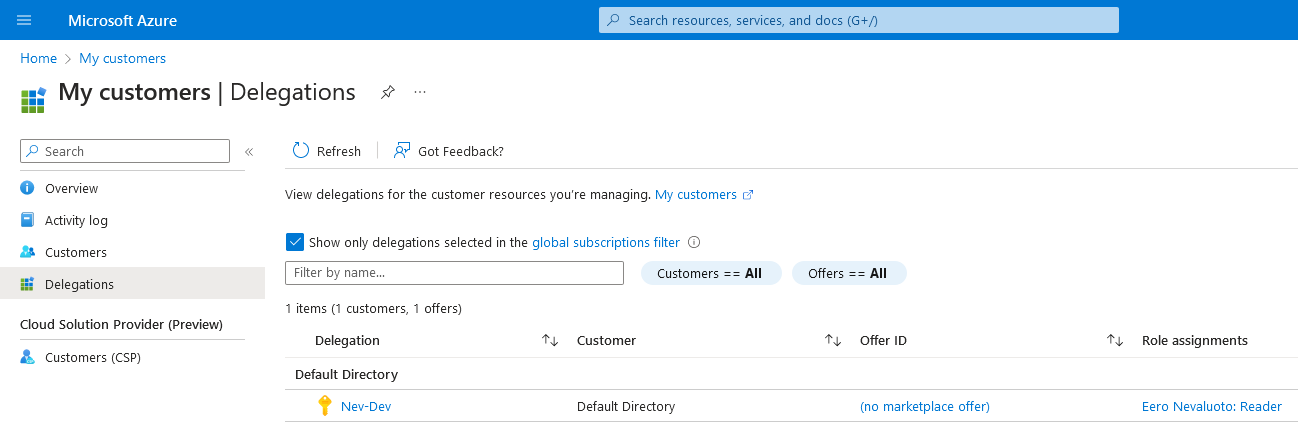
| And there it is, ready to be managed. To make things a bit easier for ourselves we can go to **Portal settings | Directories + subscription**s to make others than our own directory show up, but there’s a pretty good chance that you’ll need to wait for a random amount of time and logout and do a little dance before you can actually access the new directory and subscription, regardless of whether it shows up correctly elsewhere. Just one of those things. |
Conclusion
At the end of the day this ended up being a very simple task, and the main bulk of the work really comes from drafting up a template that has the expected and secure configuration in terms of who has access. This little exercise really clarified how Azure Lighthouse really works, and now I would be able to create a template file that could be used to onboard actual clients.