As the date for my AZ-305: Azure Solutions Architect Expert certification nears (well, I can already take the assessment, as it becomes available six months before the expiration date) I feel I should probably practice a bit first. I decided to clean up some labs I have left undone on WhizLabs, and document my findings.
To start things off, we’ll be focusing deploying a Linux VM using Terraform. Terraform is something I’ve been toying around little in my homelab, but never really got into doing anything for real with - like creating templates that could be used to re-deploy the whole thing on Proxmox if a SHTF scenario becomes a reality.
The lab, and as such a Terraform deployment, basically boils down to 5 different .tf files:
main.tf- The meat and potatoes of the operationproviders.tf- Defines the tools used and their providersoutput.tf- Defines some extra output that’s printed to the command line once the deployment finishesvariables.tf- Self-explanatory, defines variables such as the deployment regionssh.tf- Generates a random SSH key name for the deployed VM and outputs the public key
I won’t be going over the actual code in much detail, as while that is the important part, and especially to myself trying to learn Terraform hands down the main thing here, the sample code is well-documented and to be honest pretty self-explanatory anyway. But let’s go over the files in simpler terms.
Exploring the Terraform files
main.tf
Starting with main.tf, it essentially defines the deployable resources, so the VNET, subnet, public IP, NSG and the relevant rules, NIC, VM and few other smaller details. For the lab, we really only need to make sure that our resource group name is correct.
1
2
3
4
5
6
7
8
9
10
11
12
13
14
15
16
17
18
19
20
21
22
23
24
25
26
27
28
29
30
31
32
33
34
35
36
37
38
39
40
41
42
43
44
45
46
47
48
49
50
51
52
53
54
55
56
57
58
59
60
61
62
63
64
65
66
67
68
69
70
71
72
73
74
75
76
77
78
79
80
81
82
83
84
85
86
87
88
89
90
91
92
93
94
95
96
97
98
99
100
101
102
103
104
105
106
107
108
109
110
111
112
113
114
115
116
117
118
119
120
121
122
123
124
125
126
data "azurerm_resource_group" "test" {
  name     = "resource-group-name"
}

# Create virtual network
resource "azurerm_virtual_network" "my_terraform_network" {
  name                = "myVnet"
  address_space       = ["10.0.0.0/16"]
  location            = "${data.azurerm_resource_group.test.location}"
  resource_group_name = "${data.azurerm_resource_group.test.name}"
}

# Create subnet
resource "azurerm_subnet" "my_terraform_subnet" {
  name                 = "mySubnet"
  resource_group_name  = "${data.azurerm_resource_group.test.name}"
  virtual_network_name = azurerm_virtual_network.my_terraform_network.name
  address_prefixes     = ["10.0.1.0/24"]
}

# Create public IPs
resource "azurerm_public_ip" "my_terraform_public_ip" {
  name                = "myPublicIP"
  location            = "${data.azurerm_resource_group.test.location}"
  resource_group_name = "${data.azurerm_resource_group.test.name}"
  allocation_method   = "Dynamic"
}

# Create Network Security Group and rule
resource "azurerm_network_security_group" "my_terraform_nsg" {
  name                = "myNetworkSecurityGroup"
  location            = "${data.azurerm_resource_group.test.location}"
  resource_group_name = "${data.azurerm_resource_group.test.name}"

  security_rule {
    name                       = "SSH"
    priority                   = 1001
    direction                  = "Inbound"
    access                     = "Allow"
    protocol                   = "Tcp"
    source_port_range          = "*"
    destination_port_range     = "22"
    source_address_prefix      = "*"
    destination_address_prefix = "*"
  }
}

# Create network interface
resource "azurerm_network_interface" "my_terraform_nic" {
  name                = "myNIC"
  location            = "${data.azurerm_resource_group.test.location}"
  resource_group_name = "${data.azurerm_resource_group.test.name}"

  ip_configuration {
    name                          = "my_nic_configuration"
    subnet_id                     = azurerm_subnet.my_terraform_subnet.id
    private_ip_address_allocation = "Dynamic"
    public_ip_address_id          = azurerm_public_ip.my_terraform_public_ip.id
  }
}

# Connect the security group to the network interface
resource "azurerm_network_interface_security_group_association" "example" {
  network_interface_id      = azurerm_network_interface.my_terraform_nic.id
  network_security_group_id = azurerm_network_security_group.my_terraform_nsg.id
}

# Generate random text for a unique storage account name
resource "random_id" "random_id" {
  keepers = {
    # Generate a new ID only when a new resource group is defined
    resource_group = "${data.azurerm_resource_group.test.name}"
  }

  byte_length = 8
}

# Create storage account for boot diagnostics
resource "azurerm_storage_account" "my_storage_account" {
  name                     = "diag${random_id.random_id.hex}"
  location                 = "${data.azurerm_resource_group.test.location}"
  resource_group_name      = "${data.azurerm_resource_group.test.name}"
  account_tier             = "Standard"
  account_replication_type = "LRS"
}

# Create (and display) an SSH key
resource "tls_private_key" "example_ssh" {
  algorithm = "RSA"
  rsa_bits  = 4096
}

# Create virtual machine
resource "azurerm_linux_virtual_machine" "my_terraform_vm" {
  name                  = "myVM"
  location              = "${data.azurerm_resource_group.test.location}"
  resource_group_name   = "${data.azurerm_resource_group.test.name}"
  network_interface_ids = [azurerm_network_interface.my_terraform_nic.id]
  size                  = "Standard_B2s"

  os_disk {
    name                 = "myOsDisk"
    caching              = "ReadWrite"
    storage_account_type = "Standard_LRS"
  }

  source_image_reference {
    publisher = "Canonical"
    offer     = "0001-com-ubuntu-server-jammy"
    sku       = "22_04-lts-gen2"
    version   = "latest"
  }

  computer_name                   = "myvm"
  admin_username                  = "azureuser"
  disable_password_authentication = true

  admin_ssh_key {
    username   = "azureuser"
    public_key = jsondecode(azapi_resource_action.ssh_public_key_gen.output).publicKey
  }

  boot_diagnostics {
    storage_account_uri = azurerm_storage_account.my_storage_account.primary_blob_endpoint
  }
}
providers.tf
1
2
3
4
5
6
7
8
9
10
11
12
13
14
15
16
17
18
19
20
21
22
23
24
terraform {
  required_version = ">=0.12"

  required_providers {
    azapi = {
      source  = "azure/azapi"
      version = "~>1.5"
    }
    azurerm = {
      source  = "hashicorp/azurerm"
      version = "~>2.0"
    }
    random = {
      source  = "hashicorp/random"
      version = "~>3.0"
    }
  }
}

provider "azurerm" {
  features {}
 skip_provider_registration = "true"
}
As hinted earlier, this is the file that specifies things like the required Terraform version and the Azure-related resources we will be using in the main.tf file. The only thing that might not be instantly clear is the hashicorp/random, but if you recall, we’re generating an SSH key for our new instance, and this function is used to generate a random name for the keyfile. More on that later.
output.tf
1
2
3
output "public_ip_address" {
  value = azurerm_linux_virtual_machine.my_terraform_vm.public_ip_address
}
This is a very simple file, and it just exists to print out the public IP address of the deployed VM to the command line after the deployment.
variables.tf
1
2
3
4
5
6
7
8
9
10
11
variable "resource_group_location" {
  type        = string
  default     = "eastus"
  description = "Location of the resource group."
}

variable "username" {
  type        = string
  description = "The username for the local account that will be created on the new VM."
  default     = "azureadmin"
}
Next w have the variables file, which once again is a very self-explanatory one: it just specifies the deployment region and the username of the local account that will be created on the VM.
ssh.tf
1
2
3
4
5
6
7
8
9
10
11
12
13
14
15
16
17
18
19
20
21
22
23
24
resource "random_pet" "ssh_key_name" {
  prefix    = "ssh"
  separator = ""
}

resource "azapi_resource_action" "ssh_public_key_gen" {
  type        = "Microsoft.Compute/sshPublicKeys@2022-11-01"
  resource_id = azapi_resource.ssh_public_key.id
  action      = "generateKeyPair"
  method      = "POST"

  response_export_values = ["publicKey", "privateKey"]
}

resource "azapi_resource" "ssh_public_key" {
  type      = "Microsoft.Compute/sshPublicKeys@2022-11-01"
  name      = random_pet.ssh_key_name.id
  location  = "${data.azurerm_resource_group.test.location}"
  parent_id = "${data.azurerm_resource_group.test.id}"
}

output "key_data" {
  value = jsondecode(azapi_resource_action.ssh_public_key_gen.output).publicKey
}
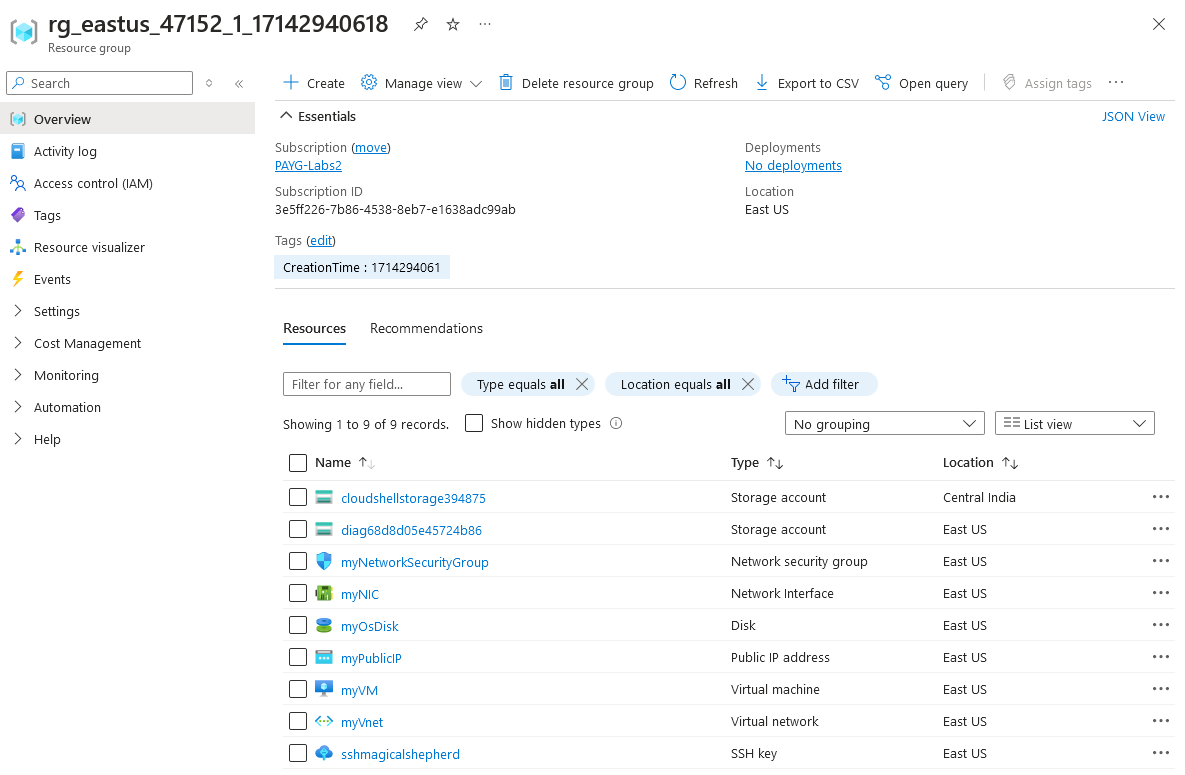
Finally there’s the ssh.tf file, which uses the randomization function to name the SSH key with an animal of sorts. You can see below in the resource list that I got the name sshmagicalshepherd. Frankly not fan of the implementation myself, but this is a rather common way to randomly name things.
Deploying the Terraform operation on Azure using Cloud Shell
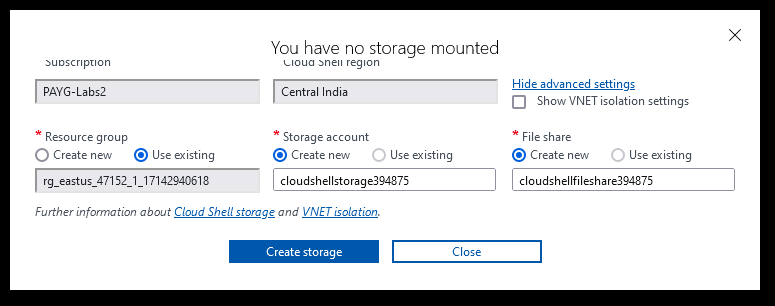
As we’ll be using the Azure Cloud Shell for the deployment we’ll need to initialize that first, given that the lab account doesn’t come with anything set up. Since we don’t have much control over things in this tenant we’ll only be adding in the storage account and file share names. Do note that the names have to be globally unique, so you might need to place a cat on the keyboard for a while.
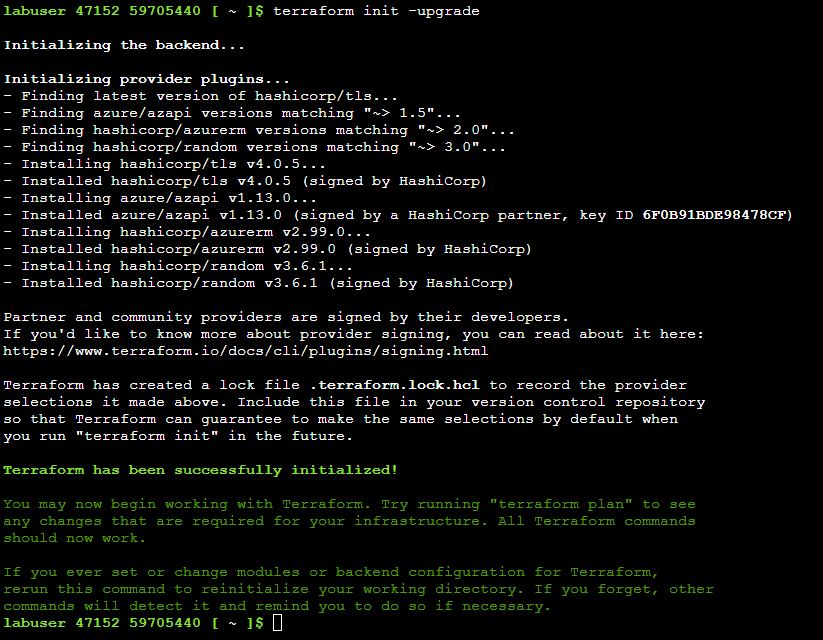
Once everything is set up we get access to the Cloud Shell, and in this instance we’ll be using Bash. We can upload the Terraform files manually with the file uploader, and then we’re just about ready for the deployment. First we need to initialize Terraform with the command terraform init -upgrade. This installs the required providers and makes sure that Terraform is ready for action.
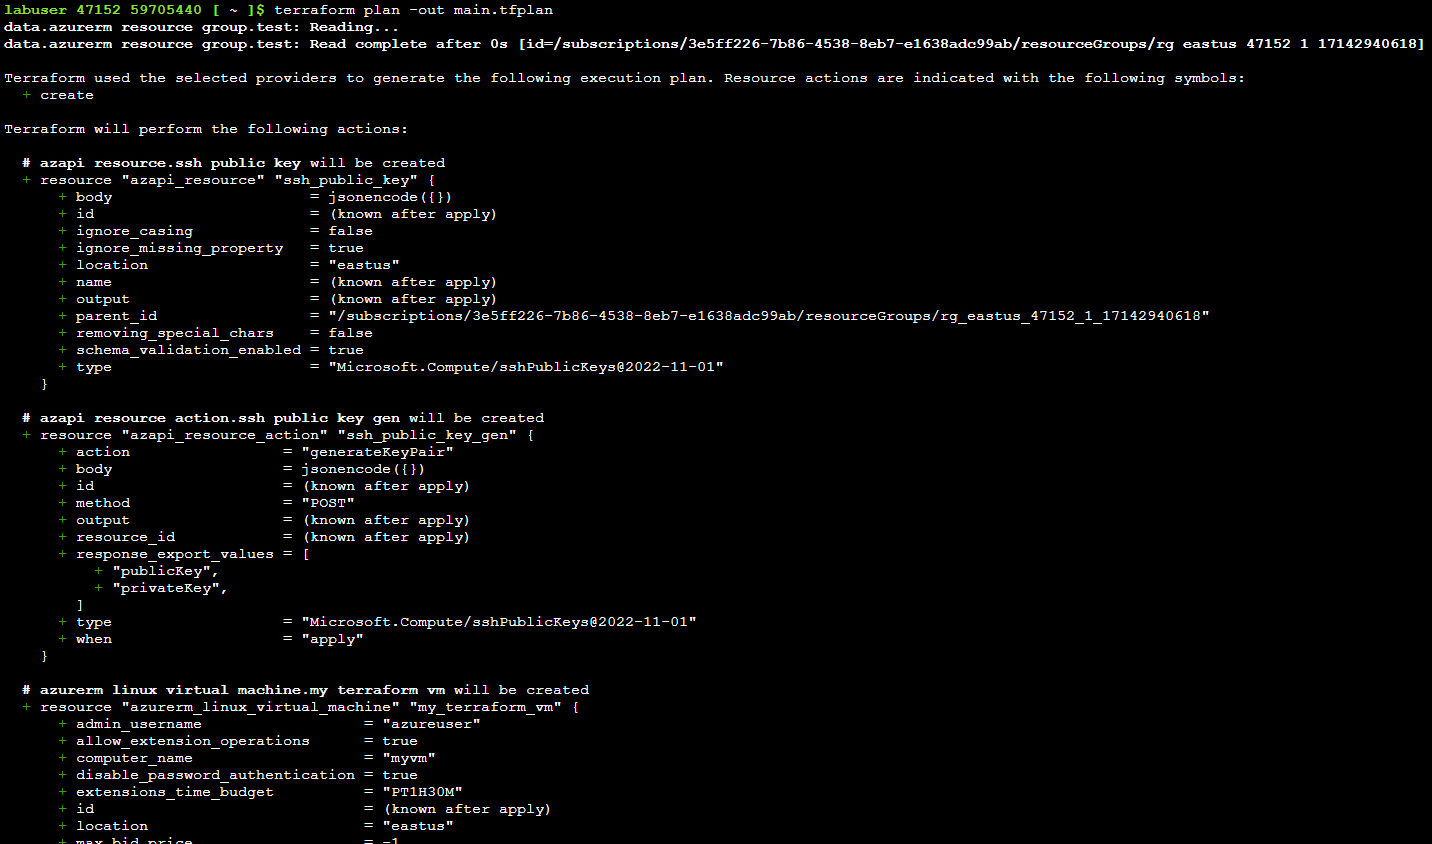
Next step is running terraform plan -out main.tfplan, which will print out the changes that will need to be made for the deployment, defined in the main.tf file. The output shows quite clearly what will be happening, and it’s quite easy to follow.
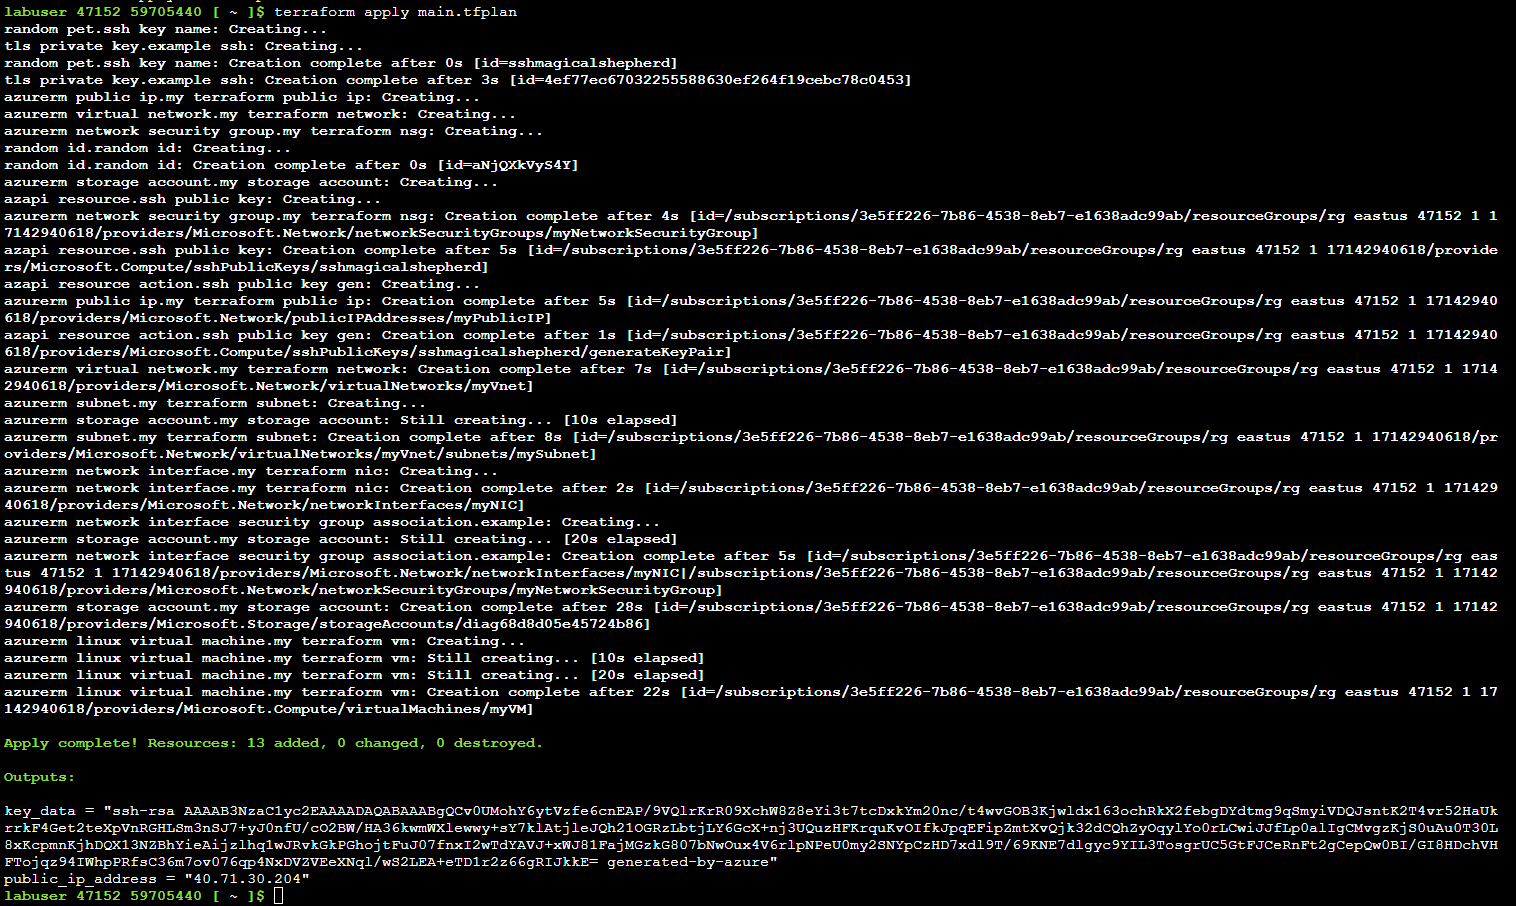
Finally it’s time to apply the deployment with terraform apply main.tfplan. The output shows the progress of the operation, and while it’s a bit messy block of text it does its job. Also notice the outputs after the deployment completes - this is the part that prints out the public key and the public IP address as discussed earlier.
Finally we can use the Portal to check that all the resources show up correctly in our resource group.
Cleanup and conclusions
As it’s a lab environment it’s good to remember to clean up after ourselves, so let’s remove the deployed resources first.
As for the conclusion, this lab helped me to get a better grasp of working with Terraform on Azure - and working with Terraform in general. In reality most of the work goes into crafting the actual .tf files, as the actual deployment is just three short commands. In any case, yet again an informative lab from WhizLabs!